How to connect Project Professional Desktop to Project Online
If you use Project Professional Desktop Client and your organization has Project Online or Project Server, you'll need to do this one-time configuration to set up a profile/account. Setting up a profile tells the client how to reach Project Online to publish your schedule.
If you've used Project Professional and Project Server in the past, the process is still the same. In previous versions, creating a profile was done using a stand-alone app that came with Project Professional. In the current version, the application has been integrated into the Desktop Client. This may be confusing for veteran users of Microsoft Project.
Step 1
- Open Project Desktop Client
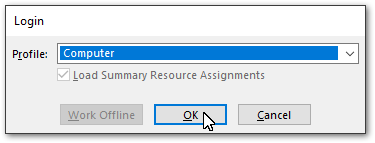
- Select the Computer Profile
- Click OK
Step 2
- Project Desktop Client will now be open but not connected to any Project Online instance
- Open a blank project so you can access the Info navigation button. The button is not available unless a project schedule is open.
- Click New.

Step 3
- Click the Blank Project button

Step 4
Now that a project schedule is loaded, in the ribbon, navigate to the backstage.
- Select the file tab
- Click the Info button
- Click Manage Accounts

Step 5
- In the Project Web App Accounts dialog
- Click the Add button to add a new connection (and profile) to Project Online
- If this is the primary profile you'll use to connect, select Set as Default

Step 6
- In the account properties dialog
- Type an account name that will identify the instance you will connect to. You can use any name you want. 'myOrganization' is just an example.
- Enter the Project Online URL for your organization
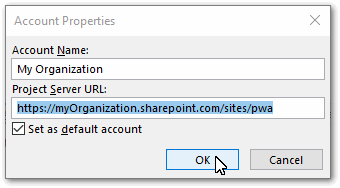
The Project Online default site URL is https://myOrganization.sharepoint.com/sites/pwa
The site name '/pwa' can be changed when the site is first provisioned. If you suspect the site name is not '/pwa', you should reach out to your Office 365 admins for assistance.
Step 7
- In the Project Web App Accounts dialog
- Click OK to accept the new Connection/Profile
- Exit out of Project Desktop Client. Establishing a connection can only be done upon launch of the Desktop Client.

Step 8
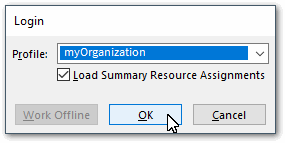
- Launch Project Online Desktop Client
- Select the new Profile you've created
- Deselect the Load Summary Resource Assignments for better performance.
- Log in with your username and password.
Step 9
In the backstage of Project Online Desktop Client,
- Click the Open button in the navigation
- Double-click the New Profile you created. In this example, it is called 'myOrganization' but you may have named it differently.
- Alternatively, click the Browse button.

Step 10
In the Open dialog:
- If you've successfully connected to the Project Web App instance, you should see the option, 'Show me the list of all projects'. Double-clicking will display a list of all available projects on the server/instance.
- If you still have issues, recheck your URL and that you've selected the correct profile. Remember, the site name may have been renamed from the default 'pwa'.
Still having issues? Contact your Project Online Admin to get additional support.


